iOS App Development Workflow Using Only iPhone
I’m Oikon. I usually play with AI tools, especially Claude Code.
Recently, I had the opportunity to speak at Claude Code Meetup Tokyo. It was hosted by AI Agent User Group (AIAU) and AI-Driven Development.
My presentation slides are here:
First iOS App Development Using Claude Code From Zero to Winning a Global Hackathon in 3 Weeks

During the presentation, when I talked about working around limitations to develop using only iPhone, it seems to have gotten a decent response, so I decided to write an article.
Mobile app developers may already know much of this information, but since my mobile app development experience is less than a month, I appreciate your understanding.
Tools and Services Used
The tools and services I used are:
- GitHub Mobile (also works in Safari)
- Claude Code GitHub Actions
- Codex Cloud
- CodeRabbit (Optional)
- Xcode Cloud
- TestFlight
Claude and Codex can work with just one of them. Personally, I like having multiple AI agents give mutual feedback, so I adopted multiple AI services.
Workflow Overview
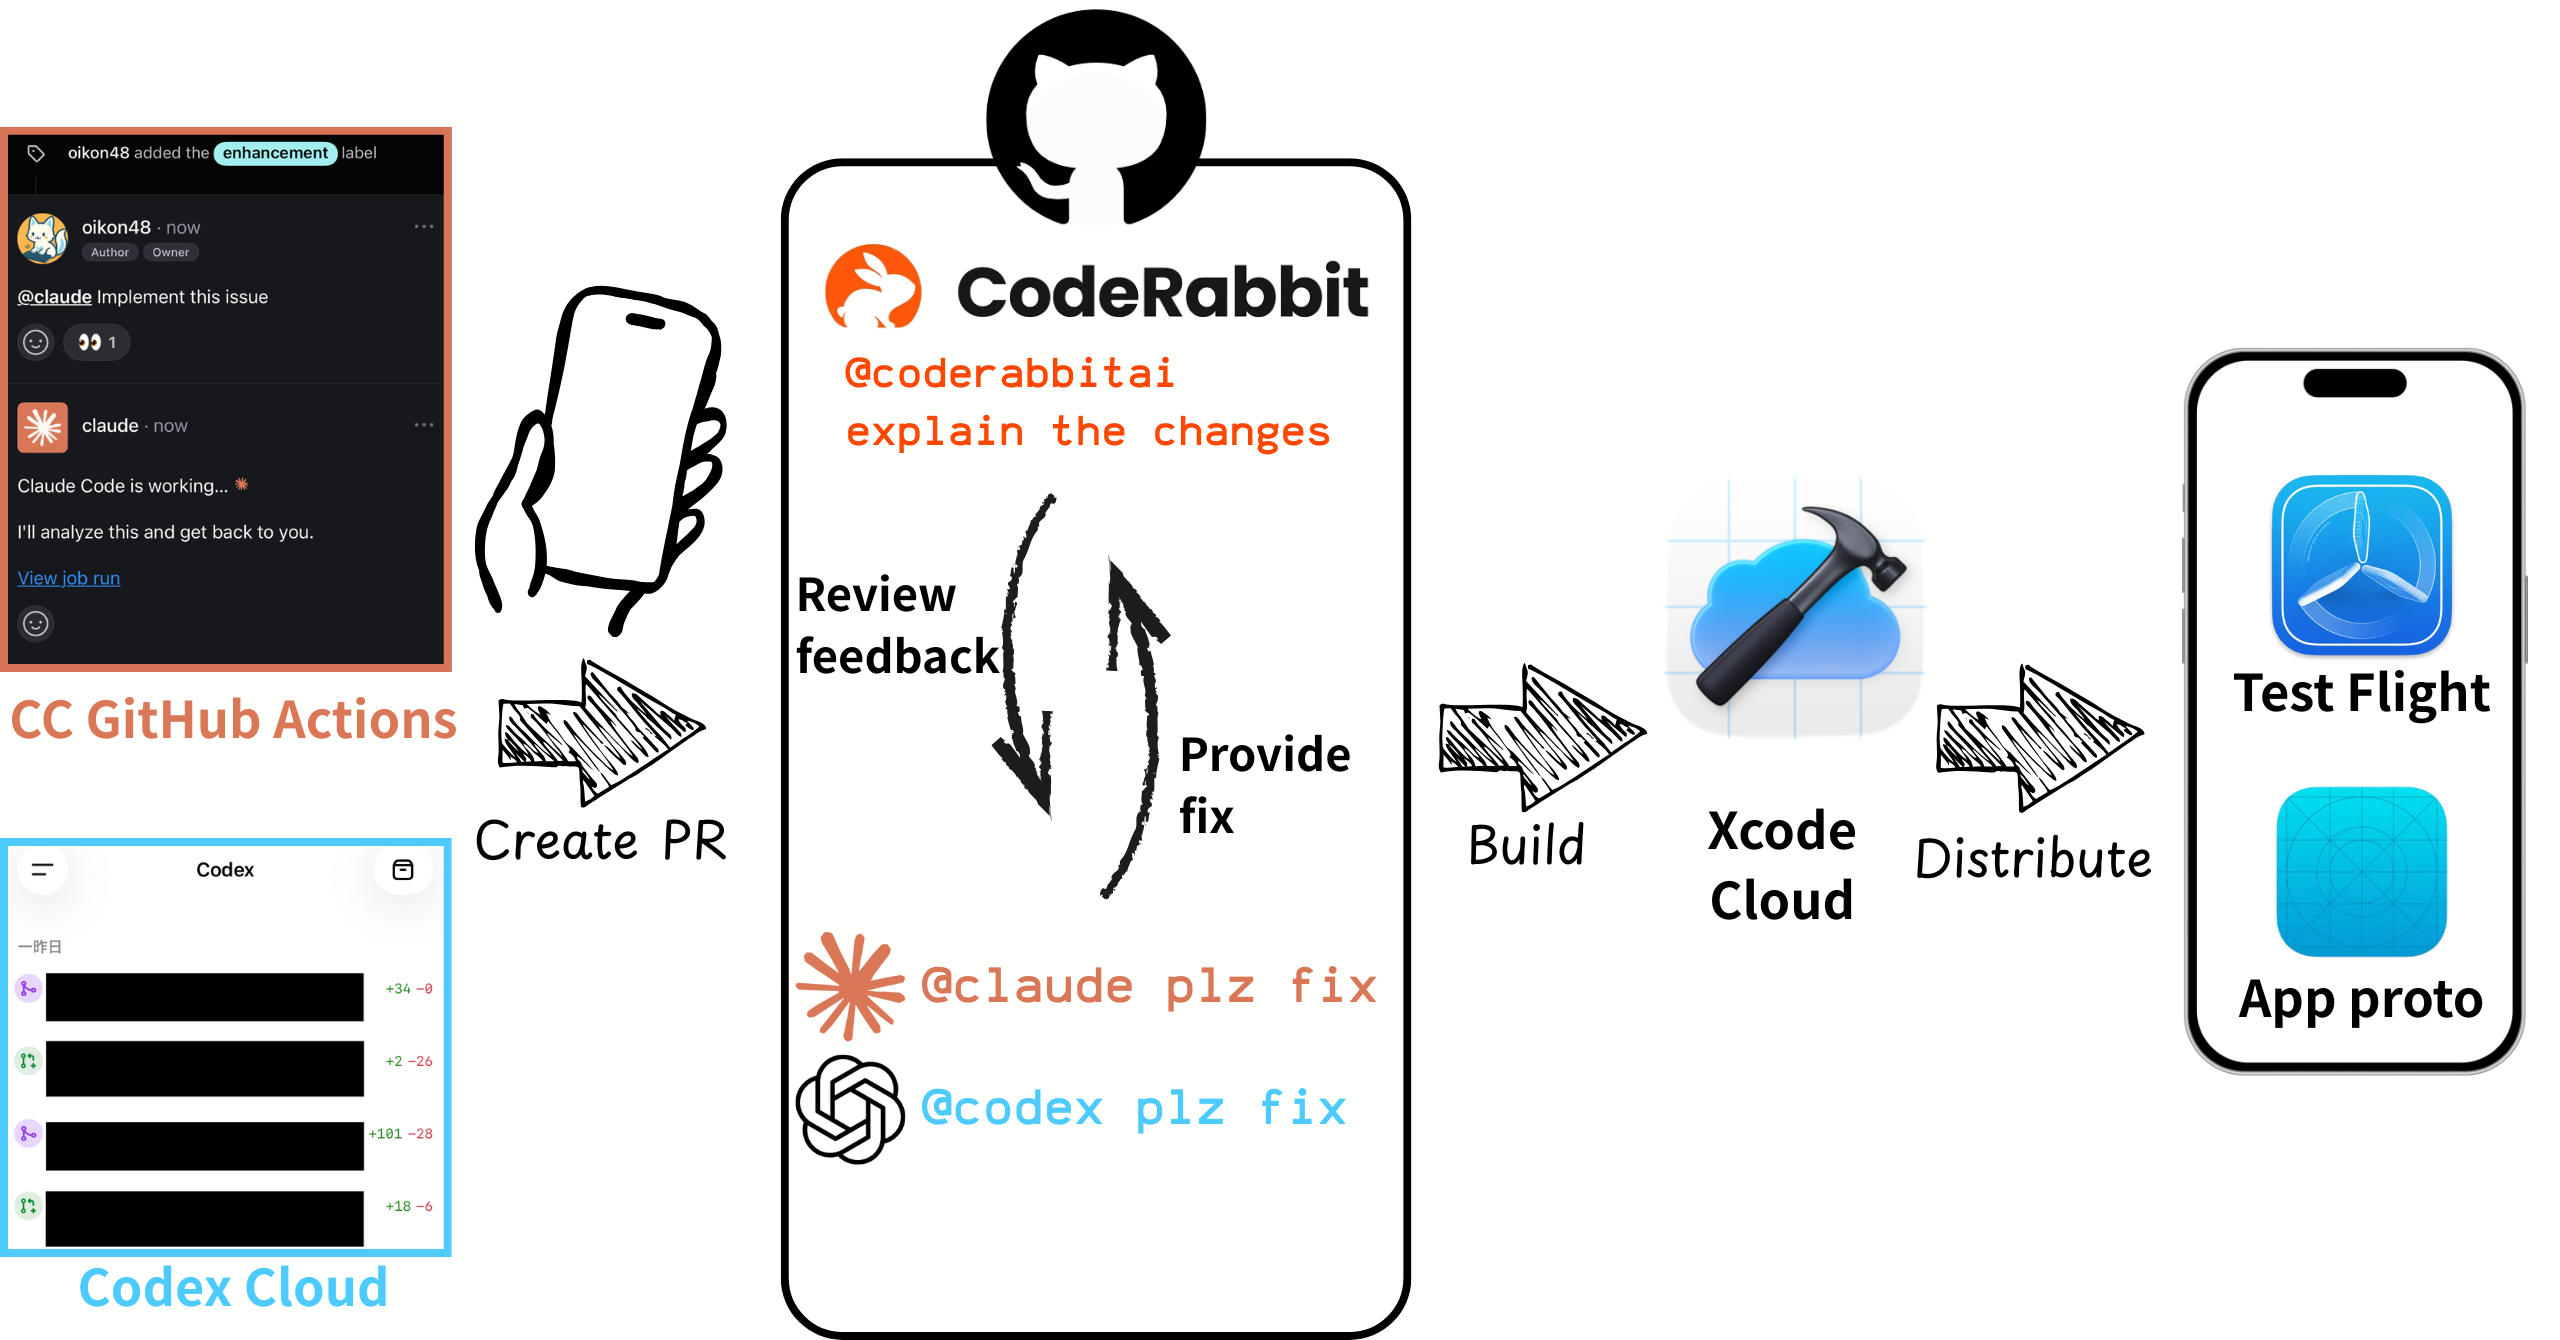
This is the actual workflow I operate. It consists of these 5 steps:
- Create PR: Create PR with Claude Code GitHub Actions or Codex Cloud
- Review feedback: CodeRabbit automatically conducts code review (Claude, Codex also possible)
- Provide fix: Provide fixes with @claude plz fix or @codex plz fix
- Build: Automatic build with Xcode Cloud
- Distribute: Distribute and test app via TestFlight
Let me explain each step in detail.
Step 1. Create PR (Claude Code GitHub Actions / Codex Cloud)
To start development from iPhone, I used Claude Code GitHub Actions or Codex Cloud.
Method 1: Claude Code GitHub Actions
Claude Code GitHub Actions is a feature that lets you invoke Claude Code by mentioning @claude from GitHub Issues or PRs. Details are in the official documentation.

Basically, you just need to run install-github-app once in Claude Code to link GitHub and Claude.
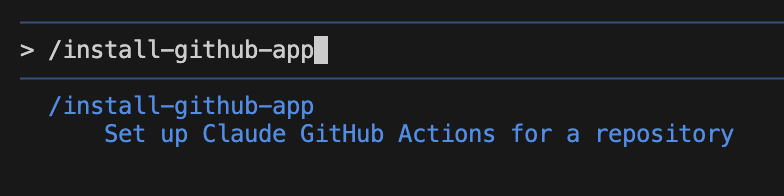
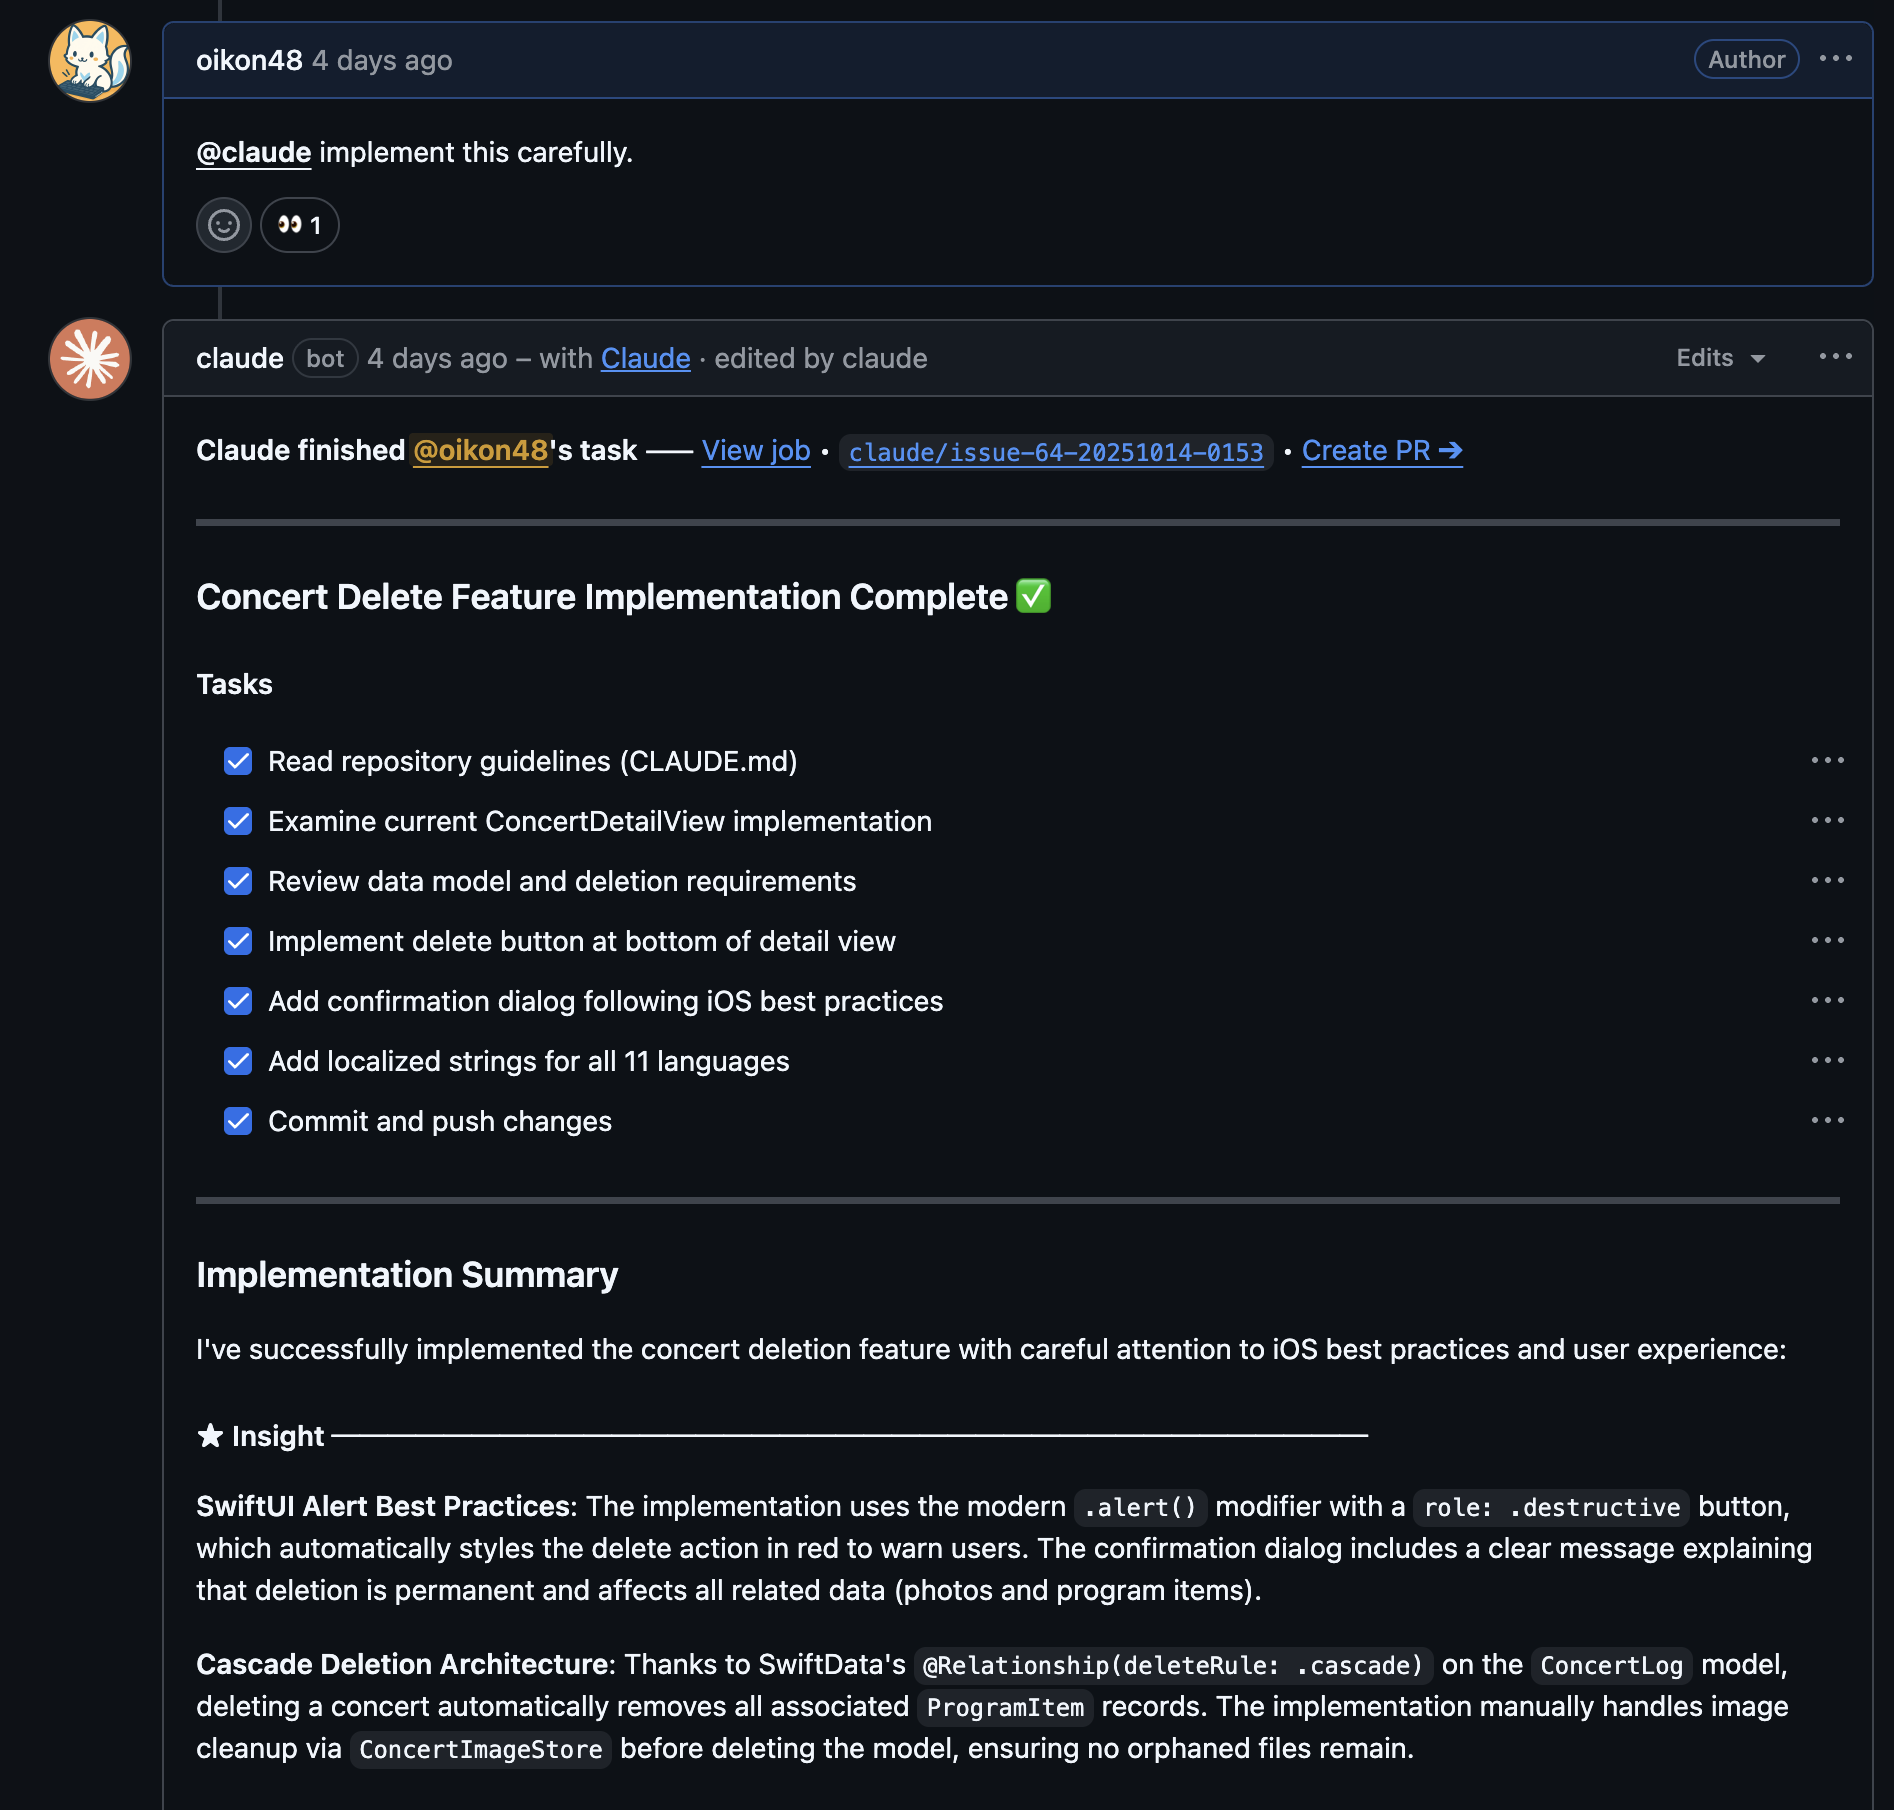
Usage: Create an Issue on GitHub, write the change plan in the Description, and ask with @claude to create the changes. Claude automatically creates a branch on GitHub, and when the task is complete, can create a Pull Request with one button.
Method 2: Codex Cloud
Codex Cloud is OpenAI Codex’s Cloud feature that can read/write/execute repository code and create PRs. Codex Cloud launches a sandboxed cloud container and executes tasks using the specified code and dependencies.
Codex Cloud can also create PRs from iPhone just like Claude Code GitHub Actions. You need to set up GitHub integration once on the Web version and configure which repositories to grant Codex permissions to.
Once configured on Web, launch Codex Cloud from the ChatGPT mobile app. You should find it immediately in the sidebar.

Codex Cloud’s feature is that it can create up to 4 changes in parallel for one task. You can create one of them as a GitHub PR.

My personal impression from using both is that Codex Cloud often had better implementation quality. Claude Code GitHub Actions was good for easy interaction and change creation on GitHub with @ mentions.
Step 2. Review feedback (CodeRabbit / Codex / Claude)
Once a PR is created, code review is automatically conducted. All three AI tools below can use auto-review:
- CodeRabbit
- Claude Code
- Codex
Claude Code and Codex can be configured for auto-review during the initial setup explained in 1. Create PR. You can also change settings from Web UI or GitHub Actions configuration files.
CodeRabbit is a review-specialized AI agent. Personally, I find it easy to use and use it quite a lot, so I delegate First Review to CodeRabbit.
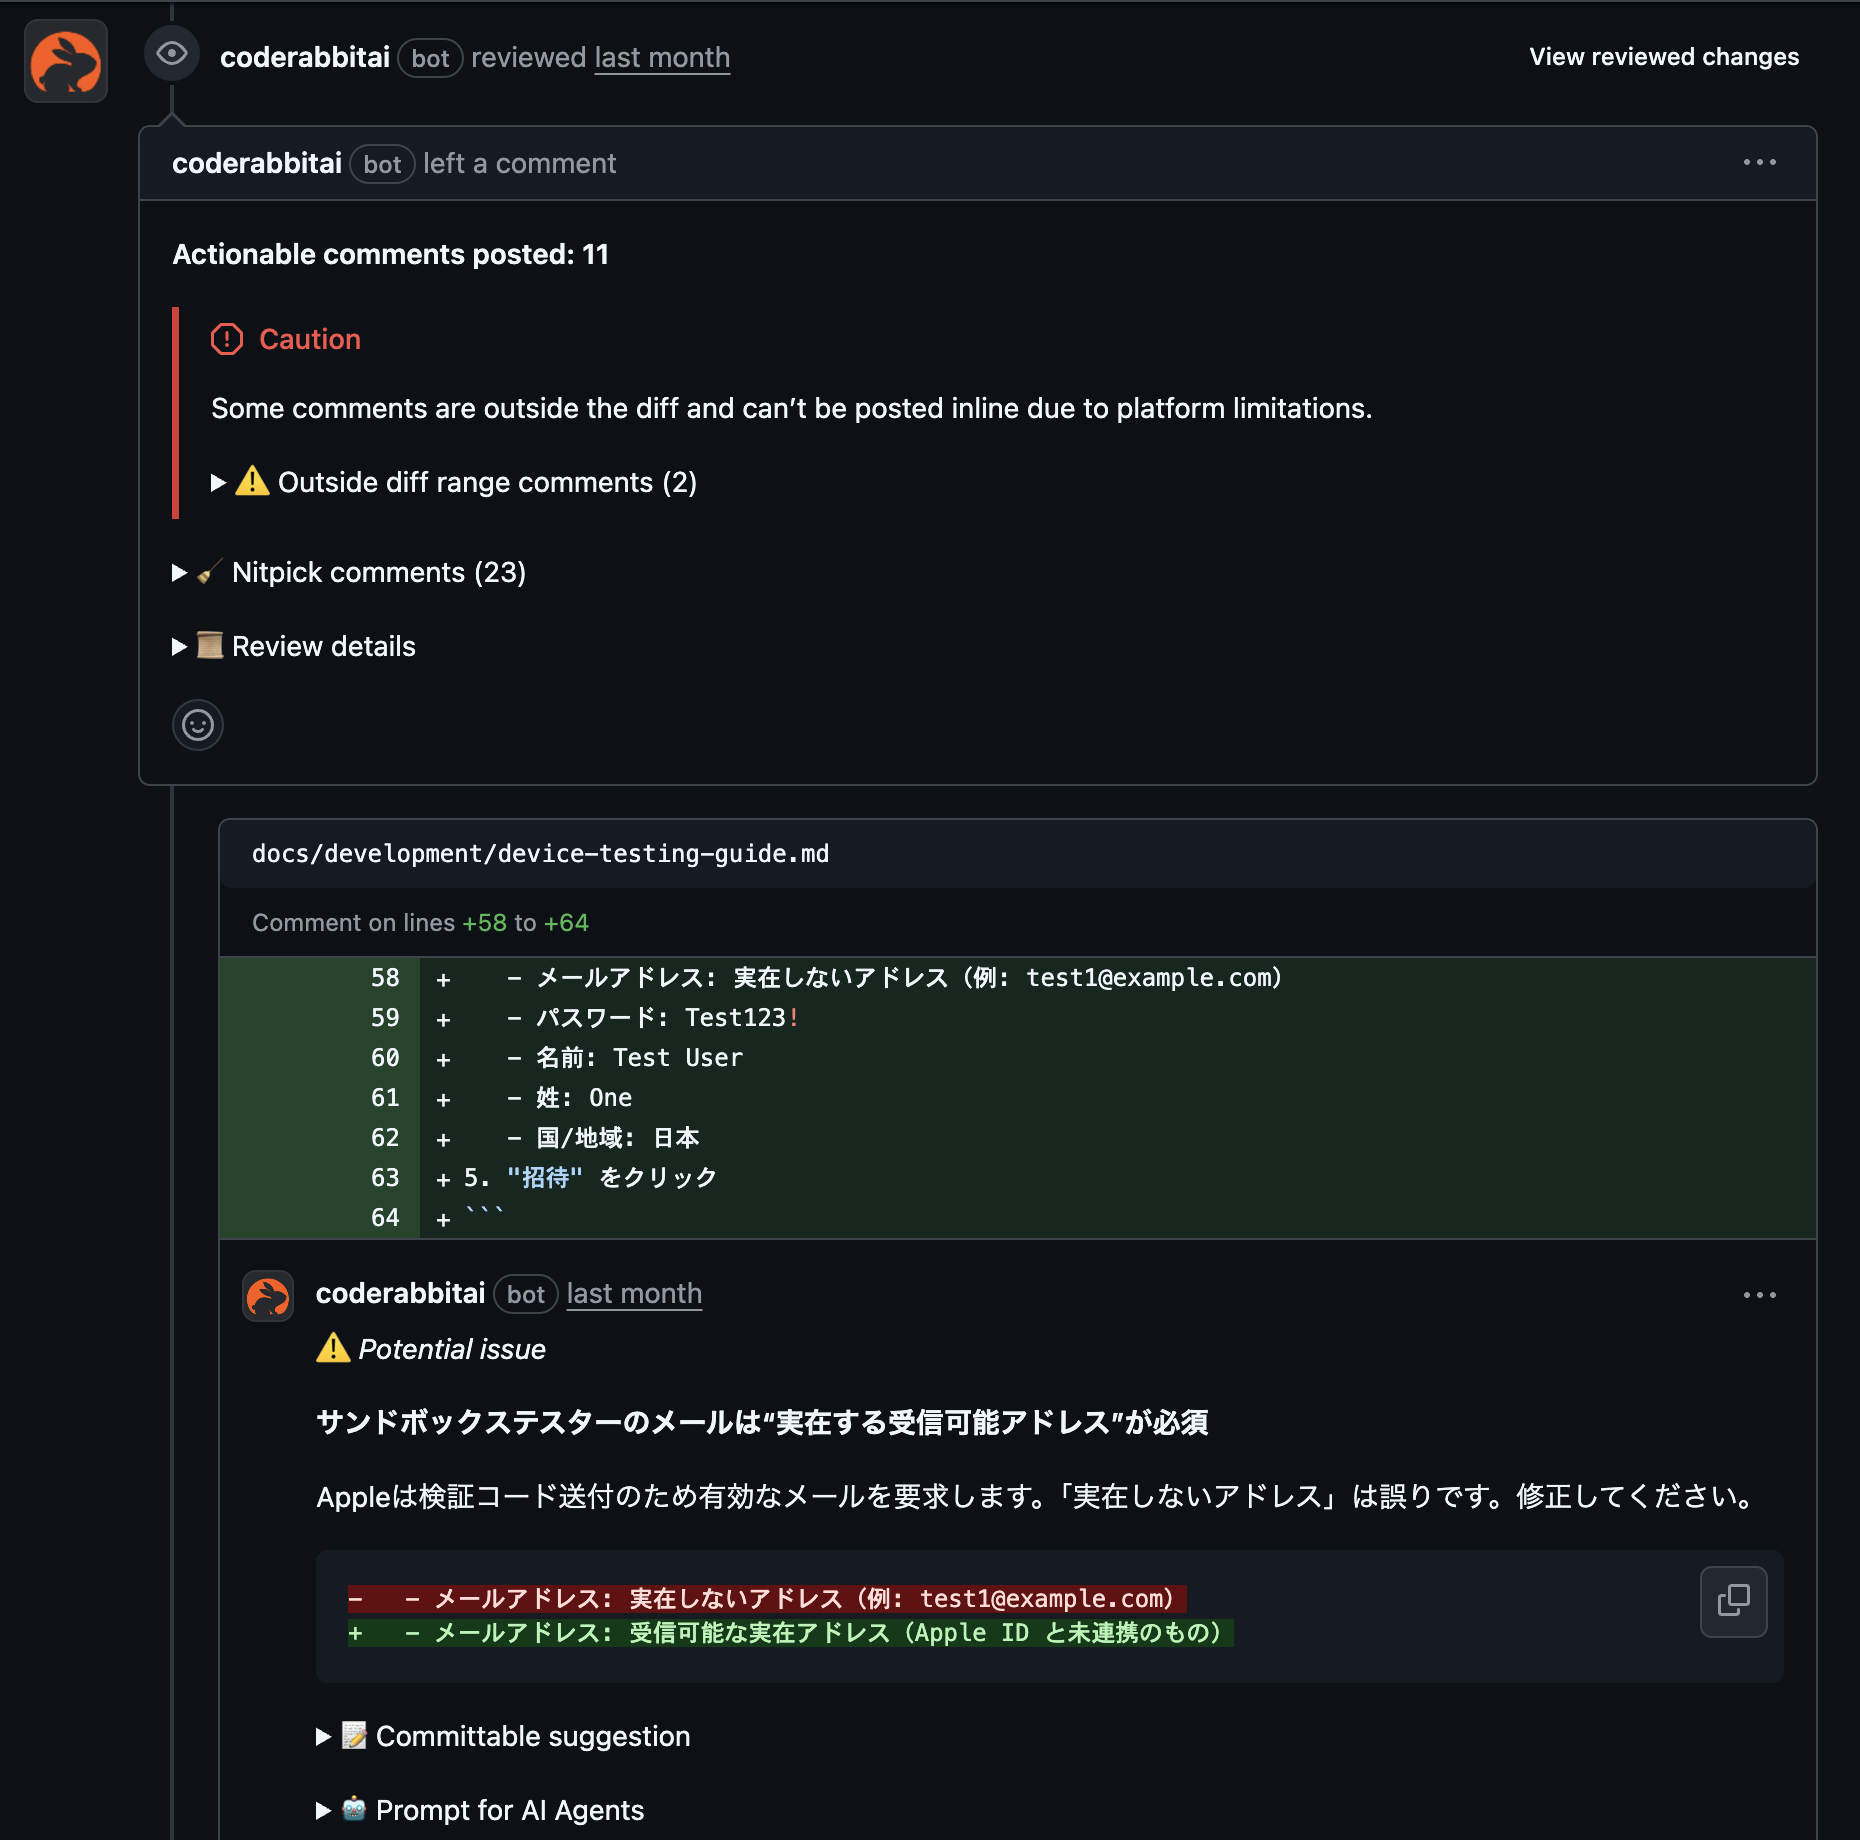
You could have all AI agents review, but when three AI agents review simultaneously, review results become overwhelming and the PR becomes chaotic, so personally the experience wasn’t great.
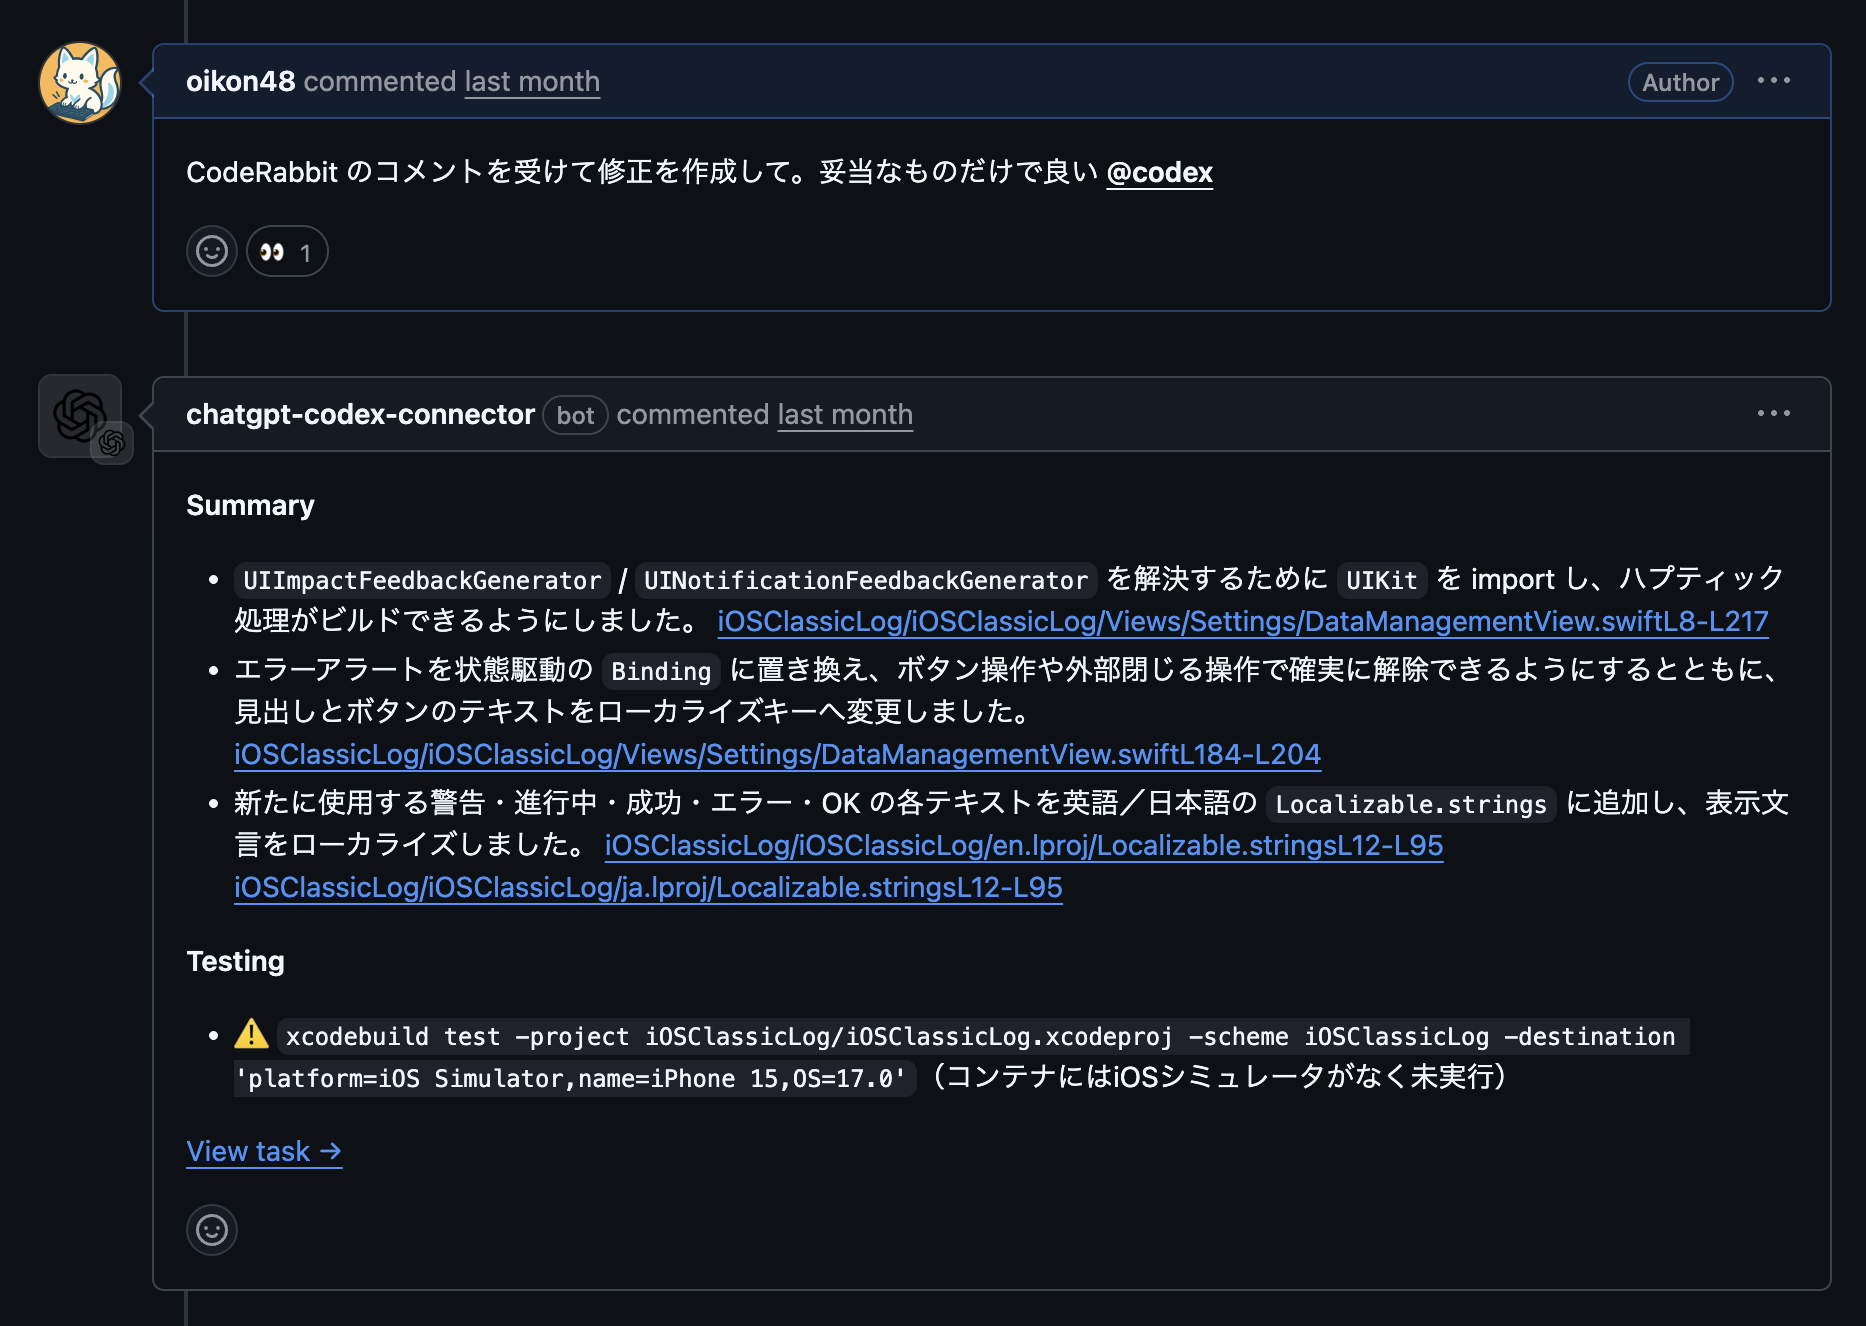
Step 3. Provide fix
After CodeRabbit reviews on the PR, I briefly look through the review content. If there seem to be review gaps, I use @claude, @codex, etc. to ask for confirmation or additional reviews.
After roughly checking the changes and review content, I judge what’s reasonable and ask Claude (@claude) or Codex (@codex) to make fixes based on the review. Note that Claude and Codex create a separate branch for changes.
The above is a bad example where I didn’t judge reasonable changes myself (lol), but generally, this is how you interact with AI on the PR to refine changes.
Step 4. Build (Xcode Cloud)
The biggest bottleneck in mobile development is the difficulty of verifying changes locally. This applies not just to mobile app development but also web app development. Of course, it’s not impossible.
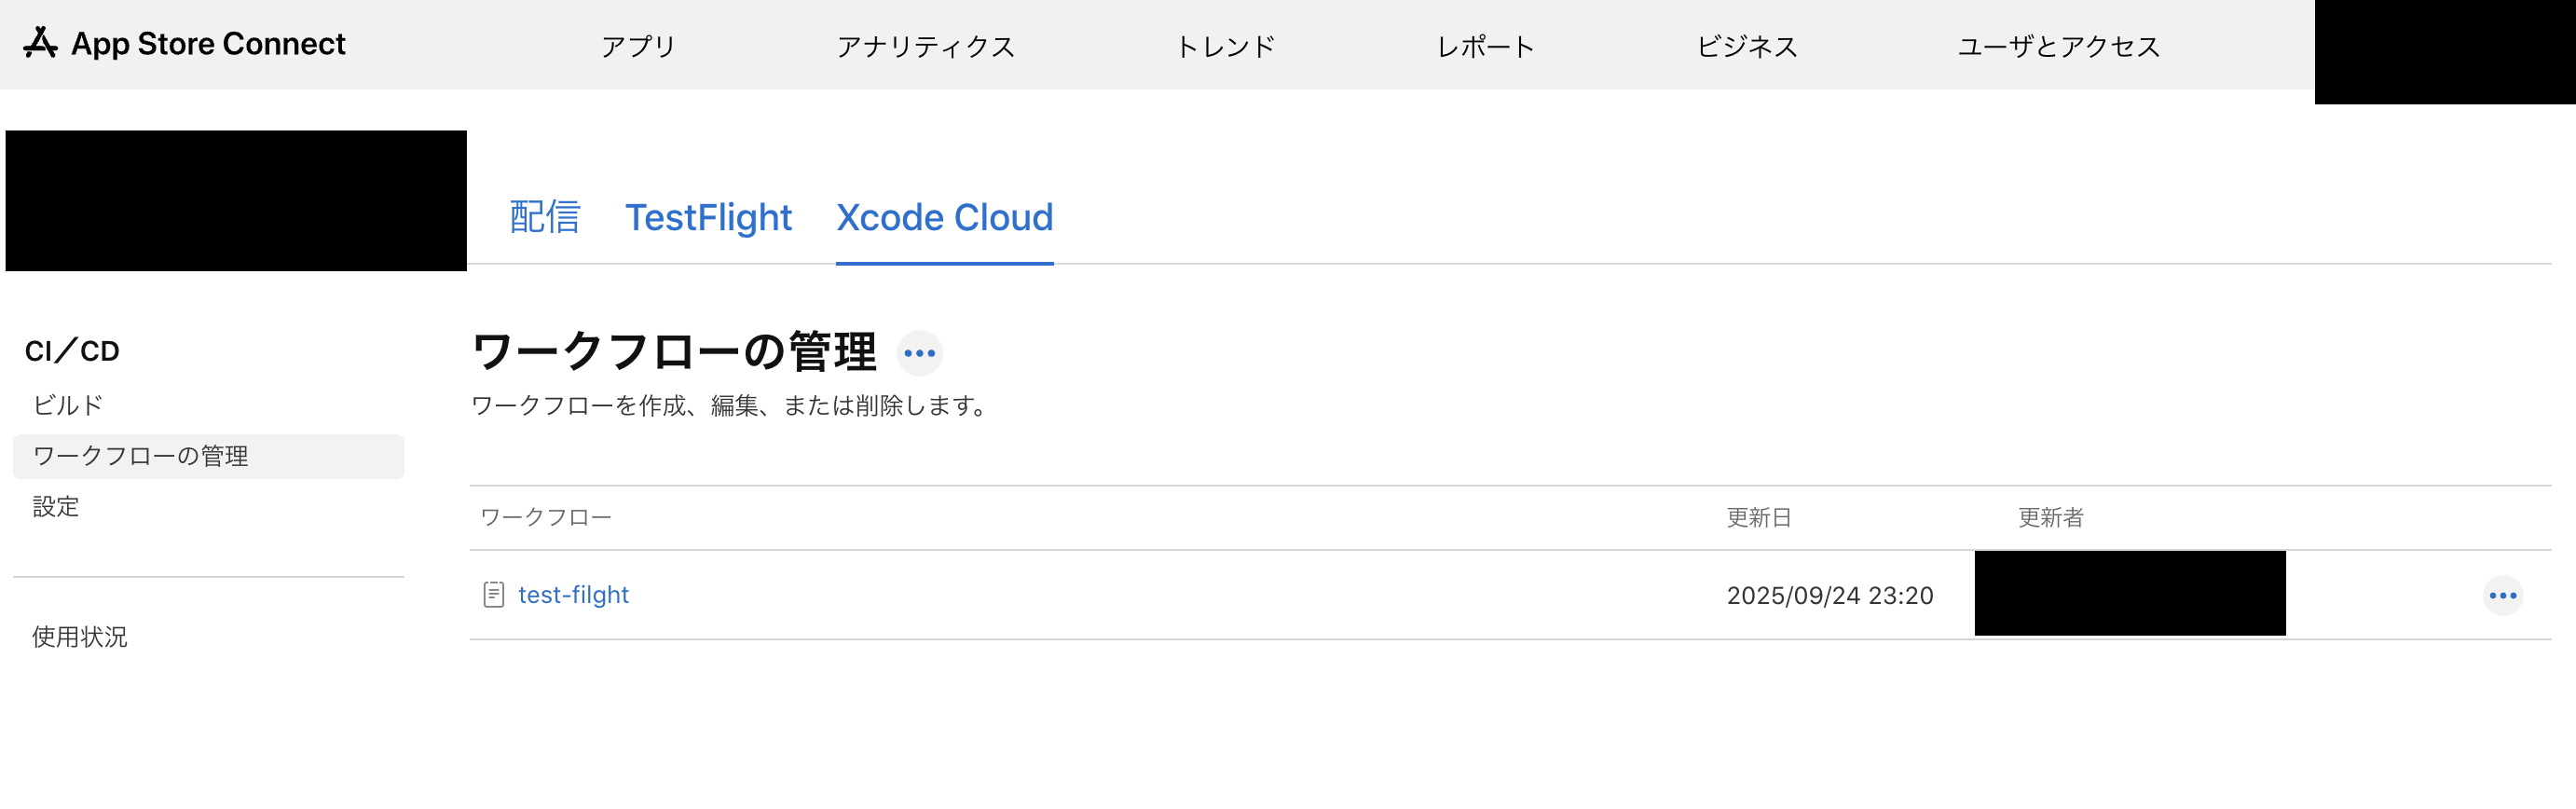
For iOS apps, Xcode Cloud lets you build automatically against PR changes with configured workflows.
This article is helpful for specific methods:
You can configure workflows to some extent in the App Store Connect UI. My workflow can be configured from the UI. By setting start conditions (triggers) related to PRs when configuring workflows, you can trigger builds with just a smartphone.
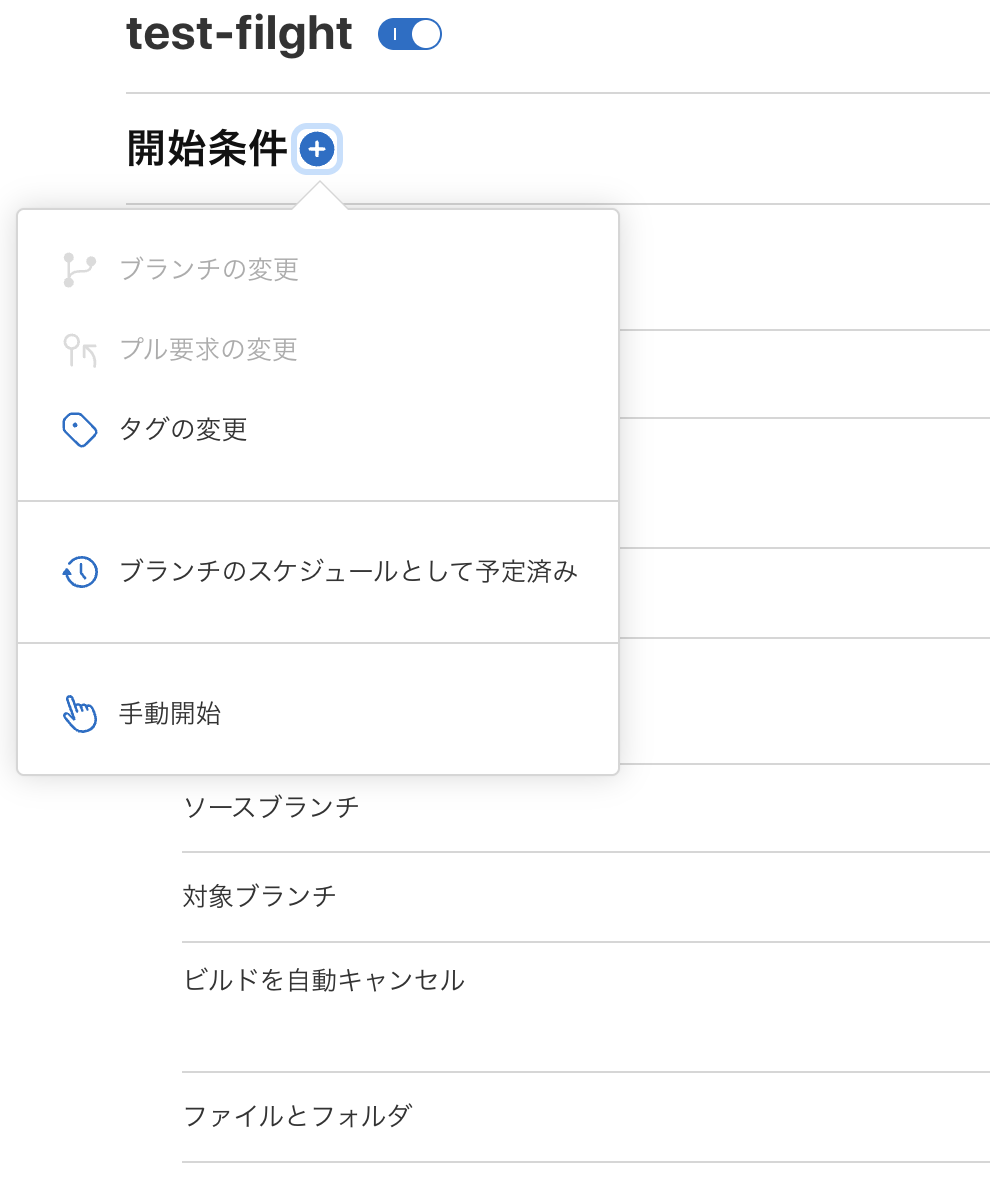
You can set several triggers:
- Branch changes
- Pull request changes
- Tag changes
- Manual start
By configuring the Xcode Cloud workflow above, you can automatically run builds from PR changes alone and verify whether changes created by AI tools build correctly. If the build fails, paste the App Store Connect build logs on the PR as feedback. This often fixes it.
Step 5. Distribute (TestFlight)
Xcode Cloud workflow settings let you configure automatic upload to TestFlight after successful builds. This fully automates not just building but also app distribution for device verification.

The TestFlight app can be downloaded from the AppStore. TestFlight is often used for tester groups to try beta releases, but I found it useful for device verification at the individual level too.
Verification with TestFlight:
- Open the TestFlight app on iPhone
- New build is available
- Install and verify behavior
Development starts from iPhone, and behavior verification completes on iPhone. If it’s an unintended change on iPhone, take a screenshot and provide feedback on the PR, and Claude or Codex will create reasonable fixes. Repeat the above cycle several times to create changes even while out. I recommend pulling locally and doing final verification before merging.
This article is helpful for TestFlight setup:

Xcode cloud offers 25 hours per month free.
You might hit limits with too many builds, but at the individual level + with proper build triggers, it should be fine.

Summary
Let me repost the workflow. This time, I introduced a workflow for iOS app development using only iPhone.
Workflow Steps:
- Create PR (Claude Code / Codex)
- Review feedback (CodeRabbit / Claude Code / Codex)
- Provide fix (@claude / @codex)
- Build (Xcode Cloud)
- Distribute (TestFlight)
Using GitHub and TestFlight distribution, minor development and fixes are possible with just iPhone. Large changes are difficult to review as a human, and Claude/Codex’s remote implementation capability sometimes falls short, so it’s good to adjust task sizes appropriately.
Follow Me on X
I also share information on X, so I’d appreciate it if you followed me!

References